What products does Digital Food offer?
Digital Food can offer a Wear OS app and a watchOS app for your restaurant, available both as a bundle and separately. To take a look, you can download our sample apps here:
Indonesian/English:
Wear OS: https://play.google.com/store/apps/details?id=business.digitalfood.watch.contoh
watchOS: https://apps.apple.com/us/app/the-bali-experience/id6745119729
German/English:
Wear OS: https://play.google.com/store/apps/details?id=business.digitalfood.watch.example
watchOS: https://apps.apple.com/app/digital-food-example/id6495637484
Polish/English:
Wear OS: https://play.google.com/store/apps/details?id=business.digitalfood.watch.przyklad
watchOS: https://apps.apple.com/us/app/digital-food-przyk%C5%82ad/id6494698029
How do we receive orders? What happens after the user clicks the “Buy now” button?
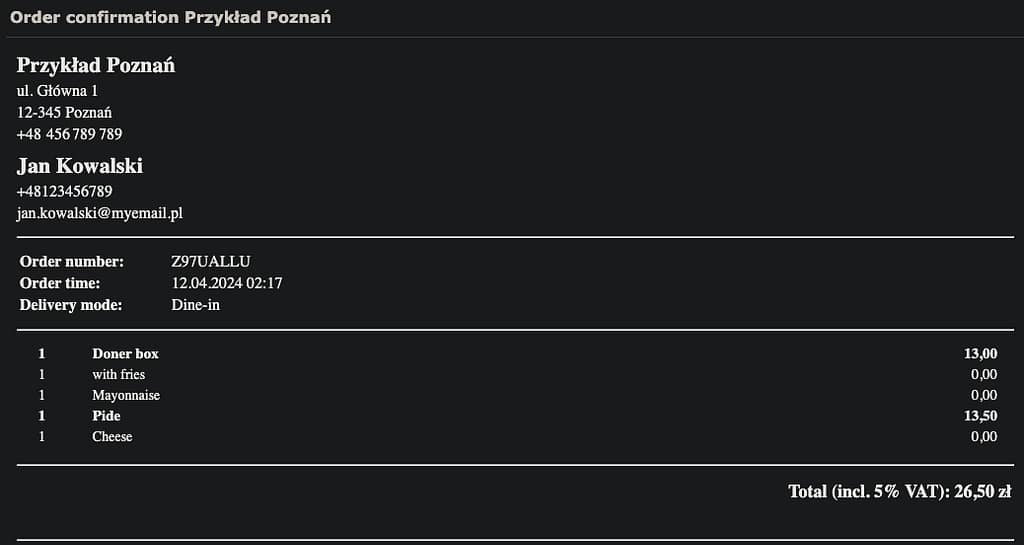
Once the user has clicked the “Buy now” button in the checkout screen of the app, the confirmation method selected upon signup is used to confirm the order. In case of email, an order confirmation email is sent to both the user’s email address, as entered in his contact data in the app, and your restaurant’s email address, as entered in the Admin UI as the restaurantConfirmationEmail. Like that, you know that an order has been placed. Please find below an example of how such an email looks like.
WhatsApp order confirmation works analogously. Please find below a sample WhatsApp order confirmation for the restaurant (left) and the user (right):

Who brings the apps to the app stores? Which support guarantees are provided?
Digital Food is responsible for managing the Wear OS and watchOS apps. This means publishing them to the app stores (i.e. Google Play Store and Apple App Store), providing names, descriptions and icons. This information can be suggested by the restaurant to Digital Food. Digital Food has the right but no obligation to provide updates for the app(s).
What is the Admin UI and how do I use it? How do I update my food and configure my apps?
The Admin UI is a website you can use to customize your app(s). After the login, you will see an overview of configuration options, thematically grouped into categories. Among others, you can enable/disable delivery modes, change opening times, fees, the supported payment methods, texts, colors and validations on this page. With the buttons on the top right, you can restore the settings to default, search for an attribute, go to your payments screen, change the language and move to the food menu.
In the food menu, you can customize your food. The table allows you to drag and drop food to a different position and add/delete a food item, as well as edit and apply any of a food item’s attributes, including images (upload and delete) and options in a separate screen (i.e. selectable add-ons for a food item, group into config and content). You can also apply all changes at once, or overwrite the food backup (i.e. the one you can restore with the button on the top right). The options menu allows you to specify single- or multiple-choice (in the config section), options to choose from (in the content section) and to apply your changes.
What is the price?
We have fixed-price and commission-based pricing models available and can discuss these with you. For the commission-based model, the provision is 5%, and there are no other costs. It means that you get more innovation for your restaurant for free, while keeping 95% of the new income! We are looking forward to building trust with you, presenting the product and evaluating collaboration opportunities. Therefore, if you are interested, please register for an account and book an appointment.
Why are no discounts on my products possible?
Because the people who win in life are the ones who are the most stable. They don’t even care about winning, but can’t save themselves from winning. By providing a good product and experience for their clients, restaurants build a fan base of theirs even if that might not even be what they were trying to do in the first place. That’s why Digital Food does not support discounts on products. Instead, you get the much better opportunity to set low BASE prices for the products on your smartwatch apps. That way, the smartwatch apps, which users download from the app stores, appeal to conscious users, the ones who not just don’t like being second-guessed (have you forgotten this product, here is our fake sliding expected delivery time window, have fun reaching the support we’ve hidden behind totally unrelated menu points, how did you like this product etc.) and do nothing about it / keep using the same things, but take action and act accordingly in their lives, choosing Digital Food. They enter the app to order food on their smartwatch gadgets, not to be second-guessed. Yes, indeed, Digital Food does not appeal to the ones that simply go with the flow and then complain why you couldn’t offer 50% off / 2-for-1 and then leave, giving you a bad rating on Google Maps because they felt entitled to everything while being a nothing themselves because they’ve let the Internet turn them into a robot imitation, but use that they can away with the transactionality and anonymity that it provides. Those can indeed go play elsewhere / into the hands of one of the sheep commanders out there.
Which languages are supported?
The app(s) will work in English and your local language. For example, English and Polish. The language will adjust based on the locale of the device: if its system language is Polish, the app will display texts in Polish, otherwise, in English.
Which payment methods are supported in the apps for the customers?
We have made a video on how you can allow customers to pay with their credit card online on their smartwatch, which they type in the details on.
Smartwatch apps are a novel topic, hence, the APIs for programmers of usual payment methods one would encounter like Google Pay and Samsung Pay are not yet available to be integrated. Apple Pay would require that you (the restaurant owner) have a merchant certificate for receiving payments, which you likely don’t have (creating it would require an annual Apple developer subscription). Other than the option for credit card payment via the Internet, which you can enable with us, and requires that you register for a Stripe account, at the moment, it’s you who is responsible for the payment – regardless whether you want to allow cash payment upon order for delivery, or card payment with your payment terminal at your restaurant for collection (or mobile payment terminals for delivery).
Which contact data can a user enter? Are ways implemented to simplify entering the information?
Name, phone number, email address, street and number, postal code, city.
To help the customer enter the information, there following simplifications are implemented:
- prefilled sample values
- import contact data by phone number
- microphone input supported
But we do not have our own delivery staff? Which delivery modes can we configure to be available?
Delivery, collection and dine-in. Can be adjusted in the Admin UI in the modeOptions, especially if some of these modes are not available for the restaurant:

Why no time tracker / But clients want to track their order?
Apart from the obvious point that these devices are too small / cannot afford to second-guess and manipulate the user / fight with him like operating systems, social media sites etc. do as to who is the sovereign (“the device will be restarted to install updates”, “are you sure / please triple-confirm”, “the file could not be opened”, various algorithms set up in a way to control you etc.) instead of the other way around (the user bought the device, therefore, the device is meant to serve the user) without the user not engaging with them anymore, the answer is: so that you don’t set yourself up with to be disappointed, i.e. with expectations (best case, you boggle your mind needlessly). Or what is the goal of that pointless overattachment, to become frustrated when the order arrives too late? Or maybe to fuel your powerlessness about the situation? No – given that you trust the solution (therefore, you use it), the way to go simply is fire-and-forget! The process does not require mind boggling afterwards from your side. That way, you use the meantime for your actual life priorities, not clinging yourself onto a screen for no goal whatsoever! And indeed, Digital Food is an offer for the conscious user of consumer electronics, not the sheep who think they want / need animations to survive and no-reply emails suggesting them what to do in their lives, rather than already having been on their own agenda and continuing it unaffected.
How do I change the food pictures?
Please keep in mind that once you change the food picture and delete it, there will be no picture displayed for the item anymore, regardless of whether there was a picture for it earlier. Changed food pictures are supported only for Wear OS.
To change the food picture, go to the food overview in the Admin UI and upload your picture there for the desired item using the blue upload button, in the “Image” column:

After the upload, the picture is going to be cached in the app on the user’s app. When you perform another upload of a picture for the same item, it will replace the old picture, without a need for the user to delete his app cache.
How do I find my Stripe API keys?
We have made a video on this. Here is the summary of it:
Log in to your Stripe account. After login, you will land on the dashboard page. Click on “Developers” on the bottom left.

You will need four API keys, two for the live mode, two for the test mode. Let’s start with the live mode. Click on “API keys“.

The publishable key you can click on and provide on your profile page right here. As for the secret key, click on “Create secret key” and “Building your own integration”. Now follow along the confirmations.


You can choose any name you like for the secret key. Afterwards, you will see it. Copy it and provide it to your profile page.

As for the test keys, click on the slider at the top right to switch from live mode to test mode. You will see the publishable and secret keys on the page that loads. Provide these on the profile page and you are done!

How do I join? The registration form seems complex!
If you are interested in the product but short on time, please contact us instead and let’s figure out together how you can get your smartwatch apps.
We have made a video explaining the registration form and providing sample values. Hopefully, this helps.